
3D Printing Workflow: Small-Batch Production Guide
Small-batch 3D printing offers a cost-effective way to produce limited quantities of customized products for niche markets like gaming and hobbyist communities. This approach eliminates expensive tooling, reduces lead times, and allows businesses to create tailored designs without committing to large inventories. Here's what you'll learn:
- Key Benefits: Steady per-unit costs, on-demand production, and design flexibility.
- Applications: Gaming accessories, fidget toys, collectibles, and prototypes.
- Efficient Workflow: From CAD modeling to slicing, printing, post-processing, and packaging.
- Cost Management: Track material use, labor, print time, and overhead to price accurately.
- Scaling Tips: Use batch management, multiple printers, and automation for growth.
Design and Preparation for Small-Batch 3D Printing
Concept Development and CAD Modeling
Start by clearly defining your product's purpose, target audience, and intended function. These initial decisions play a big role in shaping manufacturing efficiency and cost.
Begin with simple sketches - either on paper or digitally - to explore different ideas before diving into detailed 3D CAD modeling. Software like Fusion 360 or SolidWorks can help bring your concepts to life.
When designing, focus on manufacturability. Simplify geometries and reduce the number of parts to make production smoother. While intricate internal structures might look impressive, they often lead to longer print times and higher costs. A great example of balancing creativity and practicality is 3rd Prints. They adapt existing templates for custom orders, creating visually appealing designs while keeping production efficient. Their approach demonstrates how imagination and precision can work hand in hand to meet customer expectations.
Material selection is another critical factor during CAD modeling. Different thermoplastics offer distinct characteristics, such as strength, surface finish, and printing requirements. Choosing the right material and simplifying designs early can significantly reduce printing and post-processing challenges later. A solid design foundation ensures smoother transitions to file preparation and slicing.
File Preparation and Slicing
After completing your CAD model, the next step is preparing the file and slicing it. This process translates your 3D design into instructions your printer can follow, so getting it right is essential for smooth production.
Export your model in STL or OBJ format, then carefully check for errors like non-manifold edges or inconsistent scaling that could lead to print failures.
Part orientation plays a huge role in slicing. Properly orienting your design can minimize the need for support structures, improve surface quality, and enhance mechanical strength. For instance, positioning a dice tower to reduce overhangs can cut down on support material while improving the final look.
When preparing files for batch production, arrange parts strategically to make the most of your printer's build volume. Techniques like stacking or nesting parts can significantly increase output for small-batch jobs.
Layer height and infill settings are all about finding the right balance between quality and speed. For functional items like gaming accessories, a 0.2 mm layer height often works well, while infill percentages between 15% and 25% provide sufficient strength without wasting material. These fine-tuned settings help set the stage for efficient production.
Design Tips for Small-Batch Efficiency
Smart design choices can make a big difference in reducing printing time and post-processing work, which is crucial for small-batch production. Consider designing modular parts that are easy to assemble and customize.
Where possible, combine components into single prints to cut down on assembly time and costs. For example, instead of printing a dice tower in six separate pieces, design it as two or three larger interlocking sections.
Using hollow or lattice structures is another way to save material and shorten print times while maintaining strength. SLS printing, for example, benefits from the support provided by unsintered powder, allowing for complex hollow designs without requiring external supports.
To reduce post-processing, design with self-supporting angles and consolidate components. Overhangs of 45 degrees or steeper are generally easier to print without needing extra support. Avoid intricate details in areas that are hard to access. Planning for easy support removal during the design phase can also save time later.
Incorporate quality control checkpoints at every stage of the process, from file preparation to final inspection. This helps ensure consistency and avoids costly reprints. Documenting successful print settings and arrangements will make it easier to replicate results as you scale up production.
One of the biggest advantages of 3D printing is its flexibility. You can quickly tweak designs based on customer feedback or market trends without the need for expensive retooling. These design choices not only speed up production but also streamline your workflow, making 3D printing an ideal solution for customization-heavy markets like hobbyist and gaming communities.
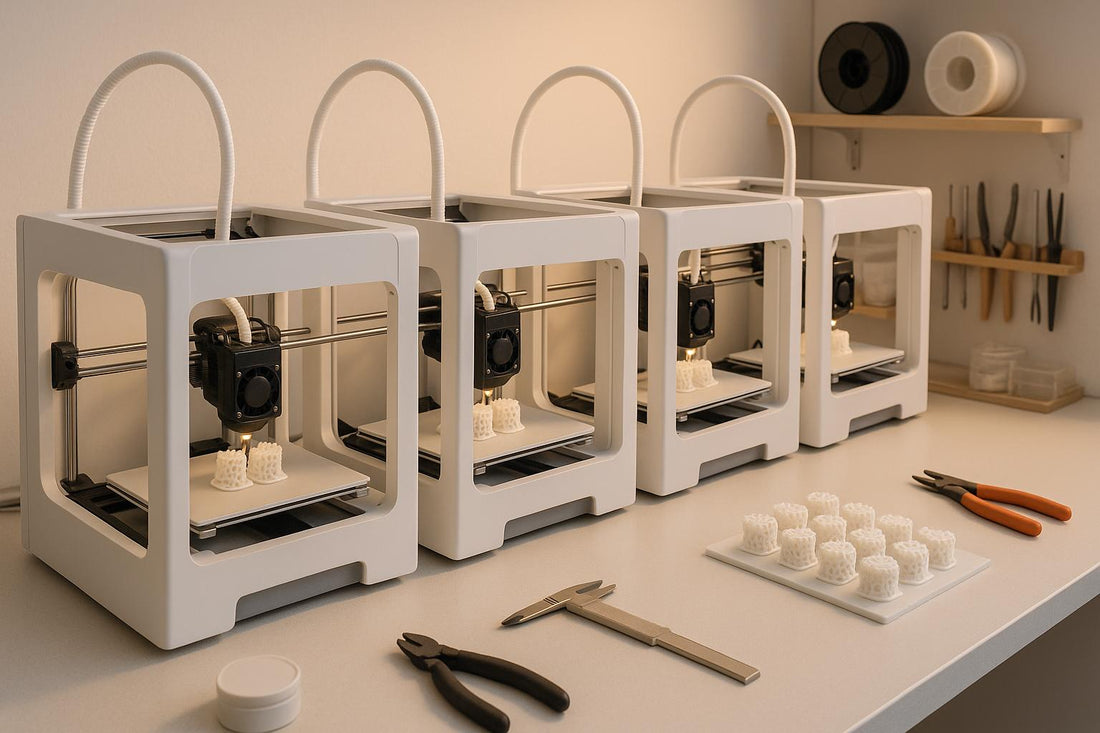
Optimizing the Printing Process for Small Batches
Choosing the Right Printer and Materials
Selecting the right printer and materials is crucial for small-batch production. Each printing method brings specific strengths, so your choice should align with your product's requirements and goals.
For cost-effective prototypes or functional items, FDM printers are a solid choice. If you're working on decorative pieces, PLA filament (priced around $20–30 per kilogram) is a great option. For projects needing more durability and heat resistance - like gaming accessories such as dice towers or fidget toys - ABS filament is a better fit, costing slightly more at $25–35 per kilogram. Keep in mind that ABS requires a heated bed and a controlled environment to reduce warping during printing.
If your focus is on intricate details and smooth finishes, SLA printers are ideal. These printers use photopolymer resins (typically $50–80 per liter) to deliver excellent surface quality. However, SLA printing comes with slower speeds and requires post-processing with isopropyl alcohol to clean the prints.
For complex geometries and efficient batch production, SLS technology stands out. Its unsintered nylon powder acts as a natural support material, allowing for stacked parts and the integration of multiple components into a single print. While SLS printers demand a higher upfront investment, they save time by eliminating the need for support structure removal and enable sophisticated internal designs.
A great real-world example of SLS in action comes from a scooter manufacturer in 2023. They produced 300 rear wheel mudguards using advanced thermoplastics. These parts met strict quality and durability standards, including alcohol resistance, and were integrated directly into final assemblies without extra processing.
Once your printer and materials are set, the next step is to fine-tune your batch production process.
Batch Management Strategies
Streamlining batch production ensures a smooth workflow while maintaining quality. The goal is to coordinate multiple printers and optimize scheduling to maximize efficiency.
One effective approach is to dedicate specific printers to certain materials. For instance, assign one printer solely for PLA projects, another for ABS, and a third for specialty filaments. This avoids the need for material purging between jobs and keeps temperature settings consistent.
Staggering start times is another smart move. Instead of starting all printers at once, initiate jobs at 2–3 hour intervals. This creates a rolling schedule, ensuring parts are ready for post-processing and inspection throughout the day rather than all at once.
Cloud-based tools can also help streamline operations. They allow remote job queuing and file preparation, cutting down on idle time.
Optimizing the build volume of each job is key. Printing multiple items - such as several keychains - in a single run reduces material waste and machine time. Strategic placement of parts can also improve their strength by aligning layer orientation with expected stress directions.
A company like 3rd Prints showcases how effective batch management works. Their made-to-order system handles a variety of items, from Halloween wreaths to Vampiric Resistance Dice Towers. By carefully scheduling and dedicating attention to each piece, they maintain both efficiency and quality.
With batch management in place, focus shifts to monitoring and troubleshooting during production.
Monitoring and Troubleshooting During Printing
To maintain consistency, proactive monitoring is essential. Combining automated tools with manual checks ensures problems are caught early.
Remote monitoring tools, such as webcams and sensors, provide real-time updates on print progress. These tools can alert you to issues like uneven heating, which could lead to warping or poor adhesion. Some advanced systems even use AI to detect errors and pause printing automatically if something goes wrong.
Common challenges in small-batch printing include warping, poor bed adhesion, and layer shifting. Warping often occurs due to uneven cooling and can be minimized with a heated bed. Poor bed adhesion might result from a dirty build surface or incorrect first layer height. Cleaning the build plate with isopropyl alcohol, recalibrating bed leveling, or using adhesive aids like glue sticks or specialized tape can help secure the first layer.
Quality control checkpoints are invaluable. Inspect the initial layers of each print to confirm proper adhesion and layer formation. Checking the dimensional accuracy of the first completed part can prevent defects from affecting the entire batch.
Environmental factors also play a big role. A stable, draft-free workspace with controlled temperature and humidity helps prevent disruptions to print quality.
Finally, regular maintenance is critical. Clean nozzles, lubricate moving parts, and replace worn components to keep printers running smoothly. Documenting successful print settings for each material and design ensures consistent results for future batches.
Post-Processing and Packaging for Small-Batch Products
Support Removal and Surface Finishing
The final quality of your 3D-printed products hinges on how well you handle support removal and surface finishing. Each printing method requires its own approach.
For FDM prints, supports can be removed manually using pliers or flush cutters. Be cautious around delicate areas to avoid damage. After removing the bulk of the supports, smooth out the attachment points with sandpaper. Start with a coarse grit (120–220) and gradually move to finer grits (400–800) for a polished finish.
SLA and resin prints need a different touch. Begin by rinsing the parts in isopropyl alcohol to clean off any uncured resin. Then, carefully remove supports using flush cutters or specialized tools. Resin prints are more brittle than FDM, so take your time to avoid cracks. These prints often require minimal sanding due to their naturally smooth surfaces.
For SLS prints, cleanup is relatively simple. The unsintered powder acts as a natural support, so brushing or using compressed air is usually enough to remove excess material. This makes SLS ideal for intricate designs or internal channels.
When it comes to surface finishing, the process typically involves progressing from coarse sanding to finer grits for a professional look. For FDM prints with noticeable layer lines, applying a filler primer before sanding can help create an even surface. Additional techniques, like using polishing compounds or buffing wheels, can further refine the finish. Rotary tools are particularly useful for reaching detailed areas quickly.
Once the supports are gone and the surfaces are smooth, the next step is enhancing the product’s appearance.
Improving Appearance with Painting and Coating
Painting and coating can take your 3D prints to the next level, boosting their visual appeal while adding protection against wear, UV exposure, and moisture.
Start with proper surface prep to ensure the paint adheres well. Clean the parts thoroughly to remove oils, dust, or residue. Then, lightly sand the surface with fine-grit sandpaper (320–400) to create a slightly textured finish, which helps the primer stick better - even smooth prints benefit from this step.
Choosing the right primer is key. For PLA, acrylic-based primers work well, while ABS or PETG often require specialized plastic primers. Apply several thin, even coats of primer to avoid drips and ensure consistent coverage.
When painting, thin layers are your best friend. Multiple light coats provide better adhesion and a more polished finish than a single thick layer. Allow each coat to dry before applying the next. For an ultra-smooth result, consider using an airbrush instead of a traditional paintbrush. To protect the paint job, finish with a clear coat or a protective spray, like UV-resistant or waterproof sealants, especially for items that will be handled frequently.
For decorative pieces, try specialty techniques like dry brushing or washing (using diluted paint to emphasize recessed details). These methods add depth and character, making them perfect for items like tabletop gaming pieces. Always test your paint on a small sample first to avoid surprises like cracking or poor adhesion.
Once the painting and finishing are complete, the final step is thoughtful packaging to showcase and protect your product.
Packaging for Custom 3D-Printed Items
Good packaging does more than just protect your product - it creates a memorable unboxing experience. For small-batch production, the goal is to balance cost, protection, and presentation.
For fragile items, custom-fit foam inserts provide excellent protection by conforming to the product’s shape. Less delicate items can be secured with options like bubble wrap or molded plastic trays.
If you're producing collectibles like gaming accessories or miniatures, packaging that appeals to hobbyists can make a big difference. For example, clear-window packaging lets customers admire the product without opening the box - a feature collectors appreciate.
Moisture protection is another consideration, especially for painted items. Including silica gel packets or using moisture-resistant bags can help prevent damage from humidity, particularly during long shipping times or in damp climates.
Adding branding elements elevates the presentation without breaking the bank. Simple touches like custom labels, branded tape, or logo stickers can turn a plain box into a polished package. Including care instructions is also a nice touch, helping customers maintain their items.
For small-scale producers, standard shipping boxes with custom inserts often strike the right balance between cost and quality. By focusing on product protection and adding subtle branded details, you can achieve a professional look without the expense of fully custom packaging.
A great example is 3rd Prints, which specializes in gaming accessories and custom items. Their packaging not only safeguards intricate details but also enhances the unboxing experience for hobbyist customers. Each package reflects the care and quality of the product inside. Regular quality control - like checking for defects, ensuring paint is fully cured, and verifying all components are included - along with customer feedback helps refine their packaging process over time.
Cost Analysis and Workflow Optimization
Estimating Costs for Small-Batch Production
To price your small-batch 3D-printed products accurately, focus on four key cost areas: materials, print time, labor, and overhead.
Material costs are the easiest to measure. Track how much material each print uses, including supports. For FDM printing, weigh the filament spool before and after printing for precise usage. SLA printing requires measuring resin volume, while SLS printing involves calculating powder consumption, subtracting the portion that can be recycled.
Print time directly impacts machine costs. Estimate this by dividing your monthly equipment expenses by total operational hours. For example, a $2,000 printer with a two-year lifespan and 2,000 hours of annual usage costs $0.50 per hour - before factoring in electricity and maintenance.
Labor costs include tasks like setup, monitoring, post-processing, and packaging. These vary widely depending on the product. A simple design might need 15 minutes of labor, while more intricate items, like custom gaming accessories, could require an hour or more for finishing and quality checks.
Overhead expenses cover your facility, utilities, insurance, and administrative tasks. Divide your monthly overhead by the number of units produced, or allocate it based on machine hours for more accuracy. For instance, a $500 monthly overhead spread across 200 units adds $2.50 to each item's cost.
To simplify these calculations, consider using software or spreadsheets to automate the process. Consistently tracking data allows you to refine your pricing and improve accuracy over time.
Planning for Failures and Reducing Waste
Once you’ve calculated your costs, focus on reducing waste by planning for potential failures and maintaining your equipment. Print failures are inevitable, but proactive measures can minimize their impact on both time and money. Build in a buffer of 10-15% extra time for reprints and troubleshooting.
Routine maintenance is essential to avoid common issues. Clean the print bed daily, calibrate your machines regularly, and replace worn parts like nozzles or FEP films on schedule. Keep a stock of spare parts for components that fail frequently, and document troubleshooting solutions to save time when problems arise.
Quality control is another way to cut waste. Catching issues early prevents wasted materials and time compared to discovering defects after a print is complete.
Smart design choices also play a big role in reducing waste. Orient parts to minimize supports, use hollow structures when possible, and consolidate multiple components into a single print. For instance, arranging multiple parts in one SLS print job can lower the cost per part by up to 50% compared to printing them individually.
Some materials offer recycling options. With SLS printing, unsintered powder can often be reused, though mixing ratios of new and recycled powder affect quality. Failed PLA prints can sometimes be recycled through specialized services or personal filament extruders, though this might not be cost-effective for smaller operations.
Applying design-for-manufacturing principles, even in 3D printing, can improve success rates. Simplify geometries, reduce overhangs, and standardize wall thicknesses to save on materials and post-processing time.
Improving Workflow for Scalability
Once you’ve optimized costs and reduced waste, focus on streamlining your workflow to scale production without compromising quality. Batch management software is a great tool for organizing multiple print jobs, tracking progress, and maximizing printer usage across several machines.
Standardizing your file preparation process can save time. Use templates for common slicer settings, adopt clear naming conventions for files, and automate repetitive tasks. This consistency also makes it easier to onboard new team members as you grow.
Regularly reviewing key metrics like print success rates, material usage, turnaround times, and customer satisfaction helps identify areas for improvement. For example, a declining success rate might signal the need for maintenance, while delays could point to capacity limits.
In 2021, a scooter manufacturer worked with 3DPlink to produce 300 rear wheel mudguards via 3D printing. This approach met specific surface requirements (like alcohol resistance) and cut costs compared to injection molding, which would have been less practical for such a small quantity.
As production scales, parallel printing - running multiple machines at once - becomes more viable. Standardizing your equipment makes maintenance and material management easier, while investing in specialized machines can help meet specific quality or material needs.
Post-processing is another area where efficiency matters. Setting up dedicated workstations for tasks like support removal, sanding, and painting can reduce handling time and improve consistency. 3rd Prints, for example, uses streamlined workflows to meet demand for custom gaming accessories while maintaining high quality.
On-demand production is an effective strategy for balancing inventory costs with customer expectations. Instead of building up stock, print items as orders come in. This works especially well for customizable products, where holding inventory isn’t practical.
As your operation grows, consider automation to save time and reduce labor costs. Features like automated bed leveling, filament runout sensors, and remote monitoring systems may require an upfront investment but can pay off by cutting down on manual effort and failed prints.
Start with simple systems for tracking and organization, then scale up as your production volume increases. Whether you’re producing 10 or 100 units, these strategies can help you stay efficient while meeting demand.
sbb-itb-c5cd7d3
Case Study: 3rd Prints' Small-Batch Workflow
Overview of 3rd Prints' Workflow
3rd Prints operates on a well-organized, family-owned model that moves seamlessly from concept development and CAD modeling to file preparation, batch printing, post-processing, and packaging.
"Using state-of-the-art 3D printing technology, we design and produce unique, high-quality items tailored to our customers' needs. Our small-batch, made-to-order approach ensures each piece gets the attention it deserves."
- 3rd Prints
Their workflow is built around modular production, running multiple printers at the same time. This setup allows them to work on several projects simultaneously without sacrificing quality. They carefully plan part orientation and batch layouts to make the most of printer space, reduce material waste, and cut down on post-processing time. At the same time, they maintain the creative flexibility that makes their products stand out.
By using test prints and iterative prototyping, they catch and fix errors early in the process. This approach reduces batch failures and ensures consistent quality across their product lines. Overall, their streamlined workflow sets the foundation for their specialized offerings.
Product Examples and Specialties
Thanks to this efficient workflow, 3rd Prints has carved out a niche with unique, small-batch products. For example, their dice towers are a standout success. Items like the Vampiric Resistance Dice Tower ($24.99) and the Cthulhu Dice Tower (starting at $24.99) feature intricate details and customizable elements. These designs highlight their ability to handle complex shapes and internal features that traditional manufacturing methods often struggle with.
Their fidget toy collection further demonstrates their expertise. Products such as the Flexi ArticuLotl ($19.99) and the Crystal Dragon ($39.99) showcase articulated designs that require precise tolerances and careful finishing. The Crystal Dragon, based on a licensed Cinderwing3D model, is a great example of how they integrate existing designs while maintaining top-tier quality.
Customizable keychains are another area of specialty. Items like the Skubbies Skeleton Keychain Figures ($24.99) and Amanda the Panda Keychain ($16.99) highlight their ability to produce small, detailed items with functional elements. Many of these keychains feature multicolor designs, requiring meticulous batch management to ensure consistency across production runs.
Additionally, their themed tabletop gaming accessories reflect their understanding of niche markets. From a Halloween wreath adorned with black cats and jack-o'-lanterns to the Coffin Break Grim Reaper Figurine (complete with pink bunny slippers), their products cater to specific customer interests while maintaining production efficiency.
Focus on Quality and Customization
Quality control is a cornerstone of 3rd Prints’ operations. They carefully select printing materials, calibrate printers with precision, and follow detailed post-processing steps like support removal, sanding, and surface finishing. For items requiring an extra touch - whether for durability or aesthetics - they apply painting or coating techniques to ensure every product meets customer expectations.
"From practical everyday tools to personalized home decor and custom gifts, every product is crafted with precision."
- 3rd Prints
Customer feedback plays a key role in their design process. 3rd Prints actively gathers input on design preferences, customization options, and overall product performance. This feedback helps them refine existing products and develop new ones that align with market demands. It’s a customer-driven approach that keeps them competitive in the fast-changing hobbyist and gaming markets.
One of the biggest advantages of 3D printing is its flexibility. Adjustments to CAD files, print settings, or product features can be made quickly and without the high costs of traditional tooling. This allows for rapid prototyping and scalable customization in small batches.
Their post-processing workflow is equally well-organized. Dedicated workstations handle tasks like support removal, sanding, and painting, ensuring consistency and efficiency. These quality and customization practices tie back to the core workflow strategies, enabling 3rd Prints to meet demand for personalized gaming accessories while maintaining the high standards that set their products apart.
Conclusion
Key Takeaways
Small-batch 3D printing brings a range of benefits that traditional manufacturing often struggles to offer. By cutting out expensive tooling and reducing lead times, it delivers a fast and cost-efficient way to produce items. It also opens the door to quick customization, intricate designs, and on-demand production, giving businesses the freedom to tweak designs without hefty setup costs.
Another advantage is the consistent cost per unit, regardless of quantity. This makes it easier for companies to experiment with designs and adjust based on customer feedback, all without committing to large inventories. Proper part orientation can further streamline production by reducing the need for supports and cutting down build times. At the same time, strong quality control measures help catch defects early, minimizing waste.
Scaling production requires effective batch management. Techniques like printing multiple parts in one job, dedicating equipment for post-processing, and using real-time monitoring systems can help ensure a smooth workflow.
With these insights in mind, let's explore how to turn this knowledge into actionable steps.
Getting Started with Small-Scale Production
If you're ready to dive into small-batch 3D printing, a strategic approach is key. Start by identifying your target market or product niche - whether that's gaming accessories, custom keychains, or practical household items. Use iterative prototyping to refine your initial designs and ensure they meet your audience's needs.
Next, choose equipment that aligns with your production goals. Consider factors like build volume, material compatibility, and reliability. For small-batch production, SLS 3D printing is a solid option because it handles complex designs well and uses unsintered powder for natural support.
Set up dedicated spaces for batch management, post-processing, and packaging. Begin with small production runs to test your processes, gather feedback, and fine-tune your methods before scaling up. Apply the design, batch management, and post-processing strategies covered earlier to keep your production efficient.
Keep a close eye on your expenses to spot areas for cost savings. For instance, batch discounts often kick in at 20 units for plastic 3D printing and as early as the second unit for metal printing.
The flexibility of 3D printing allows your operation to grow alongside demand. As your business expands, you can add more printers or automate tasks like support removal to increase capacity. This adaptability makes it easier to respond to customer feedback and shifting market trends, making small-scale 3D printing a smart choice for entrepreneurs and small businesses.
STOP Filling Your Build Plate | Design for 3D Printing
FAQs
How can I maintain high quality and reduce waste during small-batch 3D printing?
To ensure top-notch results and cut down on waste in small-batch 3D printing, precision is key at every step of the process. Begin by double-checking your design files - make sure they're optimized and free of errors. Pair this with high-quality materials and consistent printer calibration to maintain dependable performance.
Fine-tune critical settings like layer height, print speed, and temperature, as these have a direct effect on the quality of your prints. After printing, carefully inspect each item to spot any defects early on. If issues arise, tweak your process to avoid repeating the same mistakes. By staying detail-oriented, you can reduce waste while ensuring every piece meets your quality expectations.
How can I efficiently manage multiple 3D printers for small-batch production?
Managing multiple 3D printers for small-batch production can feel overwhelming, but a well-structured approach can make all the difference. Start by organizing your workflow with dedicated print schedules. Staggering jobs across machines not only maximizes uptime but also keeps your production process running smoothly.
Maintenance is another key piece of the puzzle. Regularly inspect your printers to catch potential issues early and ensure consistent performance. This proactive approach minimizes downtime and keeps your machines in top shape.
To simplify operations further, consider using automation tools or software designed for multi-printer setups. These tools can monitor all your printers at once, sending real-time updates and alerts to keep you informed. On top of that, streamline material management by pre-sorting and prepping filament or resin for each job. This small step can save you from unnecessary delays during production.
Lastly, don’t overlook quality control. Test prototypes before scaling up, and periodically check prints during production runs. This helps ensure your final products meet the standards you’re aiming for while also cutting down on waste.
What factors should I consider when selecting materials and printing technology for small-batch 3D printing?
Choosing the right materials and printing technology for small-batch 3D printing starts with understanding your project's specific needs. First, think about the functionality of the final product. Does it need to withstand wear and tear, be flexible, or handle high temperatures? Then, consider the visual aspects - do you want a particular color, texture, or finish?
When it comes to printing technology, focus on the level of detail your design requires and the materials that are compatible with that technology. For instance, FDM works well for creating durable, functional prototypes, whereas SLA or resin printing is ideal for detailed, intricate designs.
By aligning the materials and methods with your project's goals, you can produce results that deliver on both performance and appearance.