
Best Settings for Miniature 3D Printing
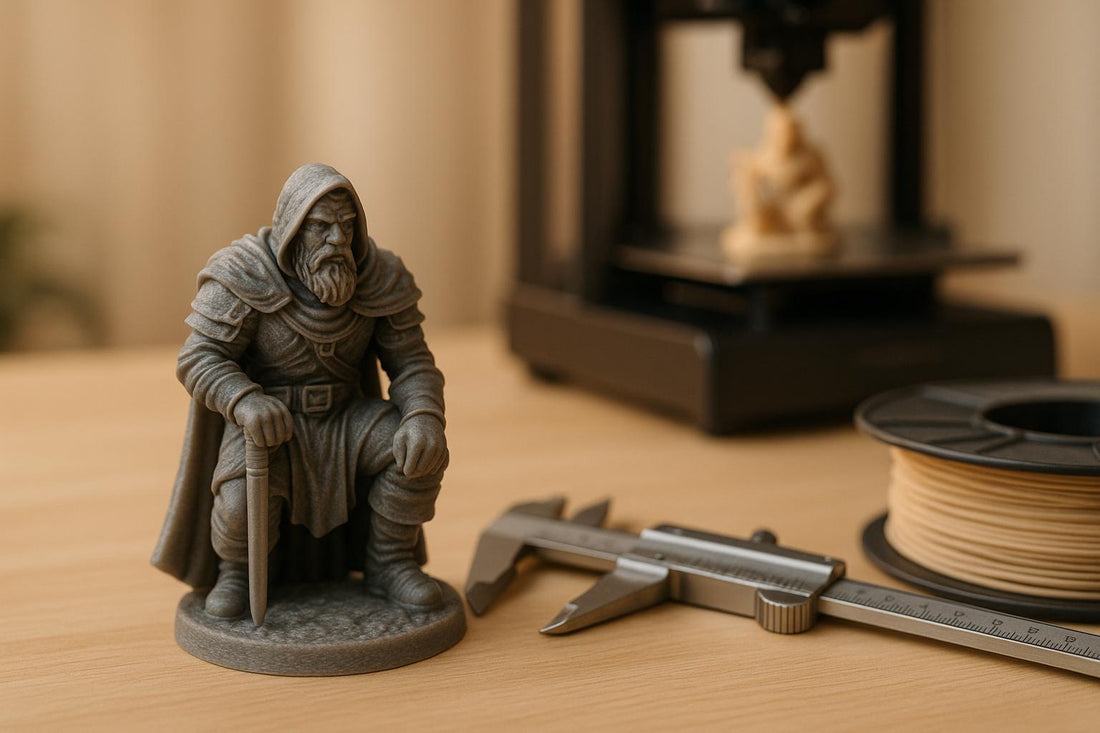
Miniature 3D printing demands precision. Small details like facial features or textured surfaces can make or break your project. To achieve high-quality results, focus on these key factors:
- Layer Height: For FDM printers, 0.1mm is ideal for balancing detail and reliability. Resin printers excel with layer heights as fine as 0.025mm.
- Calibration: Ensure a leveled bed, fine-tuned extruder, and optimal temperatures to avoid flaws like under-extrusion or weak adhesion.
- Cooling and Speed: Proper cooling prevents melting, while slower speeds (20–30 mm/s) improve accuracy.
- Supports: Use carefully planned supports to avoid damaging delicate areas during removal.
- Testing: Run small test prints to refine settings before committing to larger projects.
If you're printing for tabletop gaming, aim for 0.1–0.15mm layer heights to save time without losing quality. Display pieces or intricate designs may need finer settings but come with longer print times and higher failure risks.
Pro tip: Use slicer tools like Cura or PrusaSlicer for variable layer heights, optimizing detail where needed while reducing print time.
Master these techniques, and you'll produce miniatures with stunning detail and durability.
How To Print PERFECT FDM Miniatures! | Orca-Slicer Settings for 3d Printed Minis [UPDATED 2024]
Layer Heights and Print Resolution
Layer height plays a key role in determining your print's vertical resolution, directly influencing the level of detail and the time it takes to complete a print.
What is Layer Height?
Layer height refers to the thickness of each layer deposited by your 3D printer. Think of it like stacking sheets of paper - thinner layers create smoother, more refined surfaces.
For most prints, layer heights range between 0.1mm and 0.3mm. However, when printing miniatures, finer resolutions are essential. For example, if you're printing a 1.5-inch-tall figure, using a 0.3mm layer height can result in visible "stair-stepping" effects, ruining intricate details like facial features or engraved weapons.
Your printer's nozzle diameter limits the layer heights you can achieve. A standard 0.4mm nozzle can typically handle layers as thin as 0.05mm, but going below 0.1mm demands precise calibration. Smaller nozzles, such as 0.2mm or 0.3mm, allow for even finer detail, though they come with their own set of challenges.
Understanding these basics helps you make better choices when printing fine miniatures.
Best Layer Heights for Miniatures
For FDM printers, the ideal layer height usually falls between 0.05mm and 0.15mm. Many miniature enthusiasts prefer 0.1mm, as it strikes a good balance between capturing detail and maintaining reliable performance. Dropping to 0.05mm can capture exceptional detail, but it requires perfect calibration and can significantly extend print times.
Resin printers, on the other hand, excel at ultra-fine resolutions. Layer heights typically range from 0.025mm to 0.1mm. Resin's liquid nature allows for thinner layers without the mechanical constraints of filament-based extrusion. Most miniature makers use 0.05mm for standard prints and 0.025mm for high-end, showcase-quality pieces.
The size of your miniature also influences the best layer height. Larger models (over 3 inches) can still look great with 0.15mm layers, while smaller miniatures (under 1 inch) need 0.1mm or finer to preserve tiny details like facial expressions or accessories.
That said, finer layer heights come with trade-offs, particularly in terms of time and reliability.
Detail vs Print Time Trade-offs
Reducing layer height has a dramatic impact on print times. For example, a miniature that takes 3 hours to print at 0.2mm might take 12 hours at 0.1mm. This is because the printer needs to make twice as many passes, and each pass often runs more slowly to ensure precision.
However, the improvement in detail isn’t always proportional to the extra time. Lowering the layer height from 0.2mm to 0.1mm often results in a significant quality boost. But dropping further to 0.05mm might only deliver slight improvements while drastically increasing print time and the risk of failure.
Print reliability also decreases with thinner layers. More layers mean more opportunities for issues like bed vibrations, temperature fluctuations, or filament inconsistencies to ruin your print. Many experienced users recommend starting with 0.1mm layers to build consistency before experimenting with finer settings.
Your intended use should guide your decision. Miniatures for tabletop gaming, which are typically viewed from arm’s length, don’t require the same level of detail as display pieces meant for close inspection. Gaming miniatures often look great at 0.15mm, saving you time without sacrificing functionality.
Lastly, remember that post-processing time increases with finer layers. While thinner layers produce better quality, they also make support removal and cleanup more time-consuming. Be sure to factor in this extra effort when deciding on your layer height.
Methods to Improve Print Quality
Getting the best results from your 3D printer, especially for intricate miniatures, requires more than just selecting the right layer height. By incorporating advanced techniques, you can push your printer to deliver exceptional detail while maintaining reliability.
Using Variable Layer Heights
Modern slicer tools like PrusaSlicer and Cura come equipped with a feature called variable layer height, which adjusts layer thickness dynamically based on your model's design. This means thinner layers are applied to curved surfaces and areas with fine details, while thicker layers are used on flat sections that don’t need as much precision.
For optimal results, try experimenting with layer heights between 0.05mm and 0.15mm. These slicer programs handle transitions smoothly, reducing visible layer lines and enhancing the overall finish.
Variable layer heights are particularly effective for organic models like characters or creatures. However, for mechanical models with sharp edges, the transitions between layer heights might result in inconsistent surface textures. In such cases, sticking to a uniform layer height can provide a cleaner look.
Once you've dialed in your layer height settings, it’s essential to fine-tune your printer’s calibration to make the most of these adjustments.
Printer Calibration for Fine Details
When printing miniatures, even the tiniest calibration errors can ruin delicate features like facial expressions or intricate weapon details. Proper calibration ensures your printer performs at its best for high-resolution prints.
Start by achieving a perfectly leveled bed to ensure a solid and consistent first layer. Pay close attention to extruder calibration as well - small errors in flow rate can lead to under-extrusion, which creates weak walls, or over-extrusion, which can obscure fine details.
Regularly check your nozzle for clogs or wear, as these can lead to uneven extrusion and compromise your prints. If you notice performance issues, replacing the nozzle can make a significant difference.
To fine-tune filament settings, run temperature towers. Miniatures often benefit from printing at slightly lower temperatures than standard prints, as this helps sharpen details. However, avoid going too low, as it could weaken layer adhesion.
Testing Settings with Sample Prints
Once your printer is calibrated, test your settings with small sample prints before committing to a full miniature. These test prints can save you time and filament while helping you refine your configuration.
Calibration models with thin walls, overhangs, and bridges are great tools for evaluating your printer’s performance. They quickly highlight any areas that need adjustment.
Keeping a log of your settings for different types of miniatures can be incredibly helpful. For instance, fantasy figures might require different speed or temperature tweaks than sci-fi models with complex mechanical details. Don’t forget to note environmental factors like room temperature or humidity, as these can also affect print quality.
To evaluate the impact of layer heights, try printing the same test model with several settings side by side. This direct comparison will help you decide if the improved detail from thinner layers is worth the extra print time. Striking a balance between detail and efficiency is key, and methodical testing ensures consistent results every time.
sbb-itb-c5cd7d3
Fixing Common Printing Problems
Even with careful calibration and print tests, miniature printing comes with its own set of challenges. The tiny details and fine layer heights involved make these prints more sensitive to issues that might not affect larger models. Knowing how to quickly spot and fix these problems can save you time, filament, and plenty of frustration.
Fixing Under-Extrusion
Under-extrusion shows up as thin walls, gaps between layers, or missing details - issues that are especially noticeable when working with fine layer heights. Since less material is extruded per pass, any disruption in filament flow becomes more apparent.
One common culprit is a clogged nozzle. Even small particles can block the flow and ruin detail. To fix this, try a cold pull using cleaning filament. Heat the nozzle to about 200°C (392°F), insert the cleaning filament, let it cool to 120°C (248°F), and then pull it out quickly. This method often clears out stubborn debris that a regular purge might miss.
Flow rate adjustments can also help. Increasing the flow rate by 5–10% and raising the print temperature by 5–10°C can improve material flow. However, be cautious - too much heat can cause stringing, especially on delicate features.
Lastly, check your extruder tension. The drive gear should grip the filament firmly but not so tightly that it leaves deep marks. Once the extrusion issues are resolved, you can focus on strengthening the bonds between layers.
Improving Layer Adhesion
Weak layer adhesion can lead to fragile prints that break easily or show visible separation between layers. This is particularly troublesome for miniatures, where small features like weapons or thin limbs are more prone to snapping.
Slowing down your print speed to 20–30 mm/s can significantly improve bonding by giving layers more time to fuse. While this might extend print times, the added strength and smoother surface finish are worth it for intricate models.
Temperature tweaks can also make a difference. Increasing the print temperature by 5–10°C ensures the filament melts thoroughly and adheres well to the previous layer. For PLA, this typically means printing at 210–220°C (410–428°F) rather than the standard 200°C.
Cooling settings require balance. Too much cooling can weaken adhesion, while too little can cause overhangs to sag. A good starting point is to set the cooling fan at 50% for the first few layers, gradually increasing to 100% for overhangs and bridges.
If adhesion problems persist, consider using a heated enclosure or eliminating drafts to maintain consistent temperatures around your printer.
Reducing Print Times
Printing miniatures with fine layer heights often means long print times, but there are ways to keep quality high while cutting down on time.
One effective strategy is using variable layer heights. Set detailed areas to 0.1 mm and less visible sections to 0.15–0.2 mm. Most slicers allow you to assign different layer heights to different parts of the model.
You can also optimize infill settings. Miniatures typically don’t need more than 10–15% infill since they’re primarily decorative. For hidden areas, you can go as low as 0% infill with 2–3 perimeter walls, reducing print times by up to 40% without sacrificing the visible quality.
Print orientation matters too. Tilting your miniature at a 15–30° angle can minimize the need for supports and allow for thicker layers in some areas while maintaining detail. This works especially well for humanoid figures.
Finally, printing multiple miniatures at once can save time and improve cooling efficiency. Modern slicers like PrusaSlicer offer adaptive layer height features that adjust layer thickness based on the model's geometry, reducing print times by 15–25% while keeping details intact.
Miniature Products from 3rd Prints

With a focus on advanced 3D printing techniques, 3rd Prints brings precision to life through high-quality miniatures and accessories. This dedication to detail is evident in the impressive products highlighted below.
High-Quality Miniature Examples
Take the Skubbies Skeleton Keychain Figures, priced at $24.99. These collectibles stand out with their chibi-inspired designs, featuring intricate facial expressions, detailed costumes, and smooth, polished edges.
Another standout is the Flexi ArticuLotl ($19.99), which blends functionality with aesthetics. Its articulated joints move seamlessly, while the overall design maintains a refined and appealing look.
For fans of gothic-inspired designs, the Vampiric Resistance Dice Tower ($24.99) is a perfect choice. This piece merges intricate detailing with practicality, including a built-in 12 oz can holder, showing how utility and visual appeal can coexist in one product.
Gaming enthusiasts will also love the Cthulhu Dice Tower, starting at $24.99. Inspired by Lovecraftian themes, its organic curves and textured details showcase the capabilities of high-resolution 3D printing.
Custom Options at 3rd Prints
3rd Prints doesn't just stop at its standard offerings. The company provides customization options, allowing customers to personalize their miniatures and accessories. These custom pieces maintain the same level of detail and quality as the regular catalog.
For example, the Amanda the Panda Keychain and Myrtle the Turtle Keychain, both priced at $16.99, demonstrate how 3rd Prints adapts its techniques to different themes and vibrant color palettes.
Custom tabletop gaming accessories are another highlight. Whether modifying existing designs or creating entirely new ones, 3rd Prints ensures that every piece meets their high standards for detail and craftsmanship.
Quality and Attention to Detail
As a family-owned business, 3rd Prints takes pride in its meticulous production process. Each miniature is crafted with care, a commitment exemplified by pieces like the Crystal Dragon ($39.99). This articulated design is a stunning showcase of precision and creativity.
Another example is the Betsie the Bat Sea Star ($24.99), which highlights the company’s ability to work with flexible materials and organic shapes. The result is a design that’s both playful and expertly crafted.
Every product from 3rd Prints reflects their dedication to quality, ensuring that each piece is as detailed and well-made as possible.
Conclusion
Key Elements for Miniature Printing
Creating top-notch miniature prints boils down to mastering three essential aspects: layer height selection, precise calibration, and test printing. Let’s break it down:
- Layer height selection forms the backbone of miniature printing. Opting for heights between 0.1mm and 0.15mm strikes a great balance between capturing fine details and keeping print times reasonable. While going below 0.1mm can produce even finer features, the extra time required often makes it impractical for most projects.
- Calibration is the secret to bringing out every tiny detail, from intricate facial expressions to delicate engravings. Regularly leveling the bed, fine-tuning the extruder, and adjusting temperatures are crucial steps to ensure consistency and accuracy across prints.
- Test prints are your best friend. Running systematic test prints allows you to quickly dial in settings, saving both time and materials. This method builds confidence in your setup and ensures smoother results.
For detailed sections, consider using variable layer heights. This technique helps refine intricate areas without significantly increasing overall print time.
Why 3rd Prints Stands Out in Miniature Printing
3rd Prints showcases what happens when advanced techniques meet meticulous craftsmanship. Their work highlights how proper settings and attention to detail can transform raw 3D prints into stunning miniatures.
From intricate keychains to elaborate dice towers, 3rd Prints demonstrates how tailored approaches to layer heights, support structures, and post-processing can elevate every piece. Their range of products reflects a commitment to quality, whether it’s the Flexi ArticuLotl or the Vampiric Resistance Dice Tower. These creations are not only visually impressive but also functional, proving that great miniature printing is about both form and utility.
What sets 3rd Prints apart is their customization options. Beyond their standard catalog, they offer personalized miniatures that maintain the same high standards. This flexibility shows how mastering miniature printing opens up creative possibilities, allowing for unique designs without sacrificing quality.
Every product, from the smallest trinket to the most detailed tower, reflects the careful balance of technique and artistry. This dedication to precision and innovation sets a high bar for miniature 3D printing, demonstrating what’s possible when craftsmanship and technology come together.
FAQs
What’s the difference between FDM and resin printers for printing miniatures?
When it comes to printing miniatures, FDM and resin printers each bring unique strengths to the table.
Resin printers shine when you're aiming for intricate details and smooth finishes. With their finer layer resolutions - sometimes as small as 0.05 mm - they're perfect for small, highly detailed models like tabletop gaming figures. If precision and a polished look are your priorities, resin printers are hard to beat.
On the other hand, FDM printers are the go-to choice for those looking for a more budget-friendly option or needing to tackle larger projects. They typically offer bigger build volumes, making them ideal for printing larger models or terrain pieces. However, their layer resolution, often around 0.2 mm, tends to be coarser, which means they may not match the detail level of resin printers.
Ultimately, the choice boils down to your specific project needs - whether that's size, detail, or budget.
What’s the best way to use variable layer heights to balance detail and print time for miniatures?
To strike the right balance between detail and print time, make use of variable layer heights thoughtfully. For highly detailed areas, such as facial features, intricate armor, or other delicate sections, opt for a layer height between 0.05 and 0.1 mm. For larger, less detailed portions, you can increase the layer height to 0.15 to 0.2 mm.
This approach allows you to achieve sharp, detailed results in critical areas while keeping the overall print time manageable. It’s a smart way to ensure your miniatures look impressive without spending unnecessary hours on the printer.
What are the most common calibration issues in miniature 3D printing, and how can I fix them?
Calibration problems like uneven bed leveling, incorrect Z-axis height, and improper extruder settings can seriously impact the quality of miniature 3D prints. These issues often lead to problems like poor adhesion, inaccurate dimensions, or noticeable surface flaws.
To tackle these challenges, make sure your print bed is properly leveled and the Z-axis height is adjusted correctly to ensure precise layer placement. Fine-tune your extruder settings to maintain a steady filament flow, and perform temperature calibration to improve both extrusion and adhesion. Printing small calibration models regularly and tweaking your settings based on the results can also go a long way in improving the overall quality of your miniature prints.