
Ultimate Guide to Advanced Support Removal
Removing supports from 3D prints can be tricky, especially for detailed designs like gaming accessories or articulated models. This guide simplifies the process by covering the best tools, techniques, and methods to ensure clean results without damaging your prints. Here's what you need to know:
- Types of Supports: Breakaway supports are common but can leave marks. Dissolvable supports, used with dual-extruder printers, offer cleaner removal.
- Tools for Removal: Use flush cutters, precision knives, pliers, and brushes for clean results. Ultrasonic cleaners help with residue.
- Advanced Methods: Combine manual techniques (snapping, clipping, slicing) with chemical methods for dissolvable supports.
- Common Issues: Surface defects, breakage, and incomplete removal can be avoided with the right tools and techniques.
- Tips for Gaming Accessories: Focus on preserving functionality and aesthetics for items like dice towers, keychains, and articulated models.
Easily Remove 3D Printed Supports | 5 Methods for Clean Results
How Support Structures Work in 3D Printing
Support structures act as temporary scaffolding in 3D printing, ensuring stability for overhanging and intricate designs during the printing process. Without them, certain parts of your print could sag or fail entirely. Once the print is complete, these supports are removed to reveal the final design.
The type of support structure you choose can significantly influence how easy it is to remove them and how clean your finished print looks. This is especially important when working on detailed projects like gaming accessories, collectibles, or articulated models. Below, we’ll dive into the different types of supports, how materials affect their removal, and strategies for smart placement to get the best results.
Types of Support Structures
Breakaway supports are the most widely used and are printed using the same material as your main object. These are ideal for single-extruder printers but tend to bond tightly to the print. Removing them often involves cutting or prying, which can leave marks on the surface that may need sanding or other post-processing to smooth out.
Dissolvable supports, on the other hand, are made from materials like PVA (polyvinyl alcohol) or HIPS (high-impact polystyrene) that dissolve in water or limonene, respectively. These require a dual-extruder printer but make for a much cleaner removal process with less risk of damaging your print.
How Support Material Affects Removal
The type of support material you use directly impacts the stability of your print and how much effort is needed to remove the supports afterward. With single-extruder printers, breakaway supports are your only option. The ease of removal depends on the material: PLA supports are brittle and often snap off cleanly, while ABS supports are more flexible and may require tools like cutters.
Dual-extruder printers open up the option of using dissolvable supports, which can be removed by simply soaking the print in water or limonene. This minimizes the chance of damaging your model. However, dissolvable materials come with trade-offs. They tend to be more expensive, add to material waste, and increase print time due to the tool-switching process. Additionally, slicer settings like X/Y distance must be carefully adjusted to avoid unintentional bonding between the support and the model.
These factors also contribute to the overall cost and time of your project. Support structures, while essential, are ultimately discarded, meaning they add to material expenses. Specialized dissolvable filaments cost more than standard materials, and multi-material setups require longer print durations.
Support Placement for Complex Designs
When printing complex designs, support placement becomes critical. For example, gaming accessories like dice towers often need supports for internal ramps or overhanging ledges, but these supports must be accessible for removal through narrow openings. Articulated models and fidget toys require supports that won’t interfere with moving parts or flexible joints, which often means manually placing supports rather than relying on automatic generation. Similarly, keychains or small accessories with intricate details need minimal contact with supports to preserve fine features.
For single-extruder printers, you can make breakaway supports easier to remove by tweaking slicer settings like support density, Z-distance, and X/Y distance. These adjustments can help weaken the bond between the support and the model. If you’re using the same material for both the support and the main print to avoid tool changes, fine-tuning the XY separation is essential to prevent the support from fusing with the model.
Tools and Materials for Support Removal
Using the right tools is key to achieving a clean 3D print that’s free of support marks. The tools you choose should match the type of supports you're dealing with, whether they’re dense or involve fine details.
Best Tools for Precise Removal
The right tools can help maintain the integrity of your print while ensuring a smooth surface.
- Flush cutters: These are perfect for cutting supports cleanly without leaving marks. They’re especially useful for dense or hard supports, offering both strength and precision. The flat cutting edge allows you to get close to the print surface without causing damage.
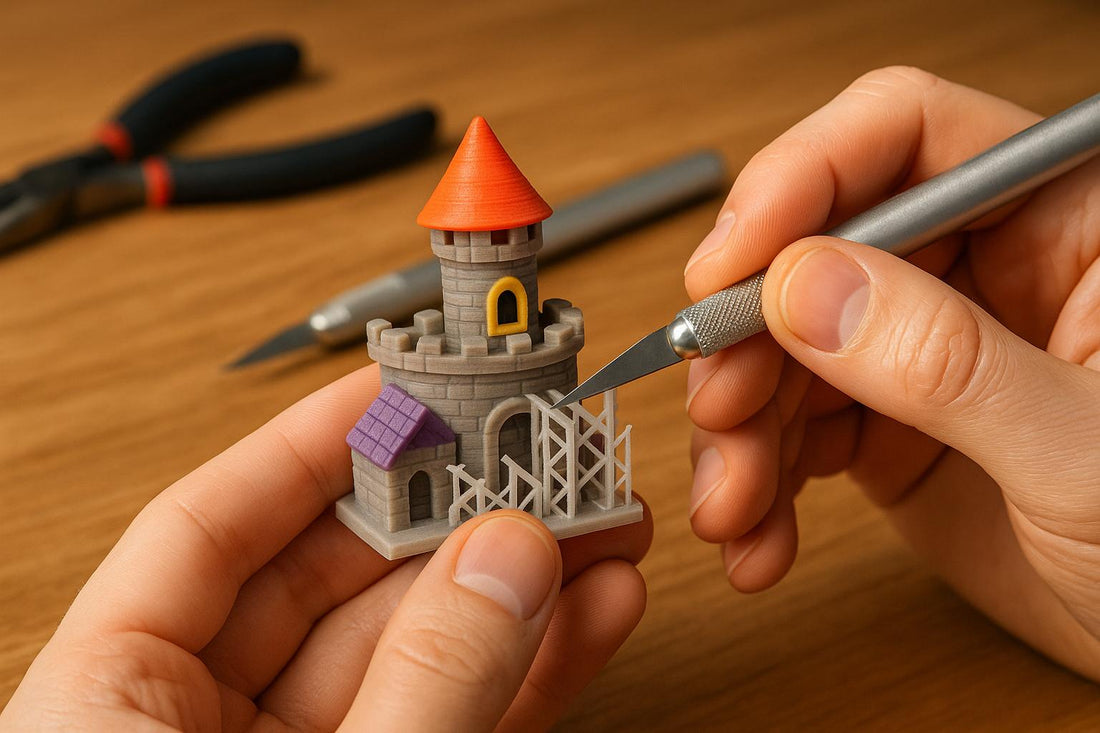
- X-Acto knives and scalpels: For delicate areas, these tools provide the precision needed to slice through support contact points. A fresh blade minimizes the risk of pulling or tearing, which can lead to pitting or breakage - particularly on articulated models or thin-walled prints.
- Precision pliers: Needle-nose pliers with smooth jaws are excellent for removing small or hard-to-reach support pieces. They’re especially handy for internal supports in hollow structures like dice towers, where flush cutters may not fit.
- Soft brushes: After removing supports, a soft brush - like a clean toothbrush - helps clear away residue without scratching the surface of your print.
- Ultrasonic cleaners: These are great for removing sticky support residue. Typically used with isopropyl alcohol (IPA), they simplify the cleaning process and leave your print residue-free.
Safety Guidelines and Workspace Setup
When cleaning prints with an IPA ultrasonic cleaner, let them dry for at least an hour to ensure the surface is no longer sticky or tacky. For resin prints, keep the surface damp while filing to reduce airborne dust, and always work in a well-ventilated area.
"Support removal post processing is very dependent on the part material, geometry and build orientation." - Matt Schmidt, Senior Solutions Engineer, Xometry
Set up your workspace with good lighting and a clean, organized surface. Keep your tools within easy reach, and use a small container for support waste to maintain a tidy and safe environment.
Choosing Tools Based on Support Type
Different support materials and print designs may require specific tools and techniques.
For non-soluble supports, flush cutters and precision knives are your go-to tools. With delicate features or thin walls, take your time and use a fresh scalpel blade. Needle-nose pliers are ideal for confined spaces, where larger tools might struggle.
- Dense or hard supports: Flush cutters are best for handling tougher supports. If supports are particularly stubborn, warming them slightly with hot water can make them easier to cut without risking damage to your print.
- Geometry considerations: Internal supports in hollow structures, such as dice towers, often require long, thin tools like needle-nose pliers or dental picks. On the other hand, external supports on simpler shapes can usually be managed with flush cutters.
Advanced Support Removal Methods
Once you've gathered the right tools and followed essential safety guidelines, it's time to choose an advanced method tailored to your print's design. These techniques, when done correctly, can elevate the quality of your final product and refine the support removal process.
Manual Methods for Delicate Prints
For prints with intricate designs or fragile features, a careful, hands-on approach is key.
- Snapping: This works best for larger supports with clear break points. Gently apply pressure at the junction where the support meets the print to snap it off cleanly. This technique is especially effective when the supports are intentionally designed to be weaker than the main model.
- Clipping: Use flush cutters to make precise cuts close to the print surface. For curved areas, angle the cutters to follow the shape of the print, minimizing sharp edges that might need further finishing.
- Slicing: A sharp X-Acto blade is perfect for thin or detailed support connections. Hold the blade at a shallow angle and use a gentle sawing motion to carefully slice through the supports without damaging the print surface.
For articulated models, take your time and remove supports one section at a time to avoid stressing or breaking the joints.
Chemical Removal Methods
Chemical methods provide a hands-off alternative, particularly useful for prints with complex geometries or supports in hard-to-reach areas. These techniques dissolve the support material while leaving the main print untouched.
Water-soluble supports, such as PVA filament, are a popular choice. To remove them, submerge the print in warm water (104°F–140°F). The water dissolves the support material, provided your 3D printer uses dual extrusion to print with both model and support filaments.
"Polymer supports can often be dissolved by water bath, while metal supports require much greater effort with machining." - Matt Schmidt, Senior Solutions Engineer, Xometry
Start with water at a lower temperature (around 104°F) and gradually increase it if necessary. Be cautious with heat-sensitive materials like PLA, as overly hot water can cause warping.
For specialized supports, solvents like limonene can dissolve specific filaments. Always ensure you're working in a well-ventilated space and adhere to the manufacturer's safety guidelines when using chemical solvents.
Finishing After Support Removal
Even after supports are removed, some marks or rough spots may remain. Finishing techniques can help achieve a professional look, depending on the print's purpose and visibility of support contact points.
- Sanding: Start with 220-grit sandpaper for rough spots, then move to 400-grit and finish with 800-grit for a smooth surface. For curved areas, wrapping the sandpaper around a pencil or dowel helps maintain the contours. Always sand along the print layers to avoid visible scratches.
- Surface Smoothing: Different materials require different approaches. For PLA, light sanding followed by a low-setting heat gun can smooth minor imperfections. ABS prints respond well to acetone vapor smoothing, but ensure proper ventilation and safety precautions when using this method.
Finishing is particularly important for items like gaming accessories or decorative pieces that are frequently handled or displayed. For example, smooth internal surfaces in dice towers ensure dice roll smoothly, while polished edges on keychains reduce wear and enhance their appearance. At 3rd Prints (https://3rdprints.com), attention to these details ensures each piece not only looks great but functions perfectly.
The level of finishing depends on the print's purpose. Functional parts hidden from view might only need basic smoothing, while decorative or customer-facing items benefit from the extra effort to achieve a polished, professional finish.
sbb-itb-c5cd7d3
Fixing Common Support Removal Problems
Even seasoned 3D printing enthusiasts can run into trouble when removing supports from their prints. Knowing what might go wrong - and why - can help you sidestep costly errors.
Common Problems and Why They Happen
Surface defects are one of the most common headaches during support removal. These can include scratches, dents, gouges, or leftover nubs, often caused by using too much force or the wrong tools [7–13]. Dense support structures with many connection points tend to leave more noticeable marks [10,12].
The design of the support structure itself plays a big role here. If supports are too strong, placed too close to the model, or fused during printing, they’re more likely to damage the surface because there’s not enough separation between the support and the print [10,11].
Breakage is another major concern. Fragile parts of a model can crack, fracture, or even break completely if too much pressure is applied during removal [7–9,11]. This risk increases after the print is removed from the build platform, as it loses the added stability provided during printing. Similarly, supports that are tightly bonded to the main model can cause cracks or dents when snapped or peeled off.
Warping and melting can happen when heat-based removal methods are misused. Overexposing a print to heat - like a heat gun - can soften the material too much, leading to deformation of the main model.
Incomplete removal leaves behind small nubs or debris, which is often the result of a rushed process or failure to clean out hard-to-reach areas thoroughly [8,9,11,13].
How to Fix and Prevent Problems
Building on earlier techniques, here are some practical ways to tackle these common issues and achieve a smooth finish.
To prevent surface defects, focus on gentle, controlled movements. Avoid sudden jerks or excessive force. When using tools like flush cutters, make multiple small cuts rather than trying to remove large chunks all at once. For prints with dense supports, tweak slicer settings to reduce support density or increase the gap between supports and the model. If you do end up with surface imperfections, sanding the affected areas gradually can help smooth them out.
To avoid breakage, handle fragile prints with care. Support delicate sections with one hand while removing supports with the other, and work on small areas at a time - especially for thin-walled or articulated designs. For particularly fragile parts, consider leaving supports in place for added stability during handling. If breakage does occur, clean breaks can often be repaired with cyanoacrylate (super glue), while two-part epoxy works well for more complex fixes. Light sanding afterward can help blend the repair with the surrounding surface.
Preventing warping requires careful use of heat. When using a heat gun, keep it moving and maintain a safe distance from the print. Start with a low heat setting and increase gradually to ensure only the support material softens, leaving the main print intact.
To ensure complete removal, inspect your print thoroughly once most supports are gone. Good lighting is essential for spotting any leftover material, especially in internal cavities or overhangs. Use tools like a dental pick or small needle-nose pliers to reach and remove stubborn remnants.
Comparing Different Removal Methods
| Method | Best For | Advantages | Disadvantages | Risk Level |
|---|---|---|---|---|
| Manual Snapping | Large, well-designed breakaway supports | Quick and tool-free | Can leave rough edges; risk of breakage | Medium |
| Flush Cutting | Precise removal near detailed areas | Clean cuts with good control | Requires steady hands; time-consuming | Low |
| Chemical Dissolution | Complex geometries or hard-to-reach supports | Hands-off process; avoids mechanical stress | Limited to compatible materials; time-intensive | Very Low |
| Heat Application | Stubborn supports on heat-resistant materials | Softens tough connections | Risk of warping the main print | High |
| Rotary Tools | Heavy-duty removal for thick supports | Fast material removal | High risk of surface damage; requires skill | Very High |
The key to successful support removal is choosing the right method for your specific print material and support structure. For example, chemical methods are great for intricate designs like dice towers, where internal surfaces need to be pristine for functionality. On the other hand, for items like keychains that are frequently handled, a manual approach combined with careful finishing ensures a polished, professional look.
These tips offer a solid starting point for troubleshooting and perfecting your support removal process, especially when working on specialized designs.
Support Removal for Gaming Accessories and Collectibles
When it comes to gaming and hobby items, removing supports requires extra care compared to standard 3D prints. These pieces - ranging from articulated fidget toys to functional dice towers - need attention to detail to preserve both their visual appeal and mechanical functionality. Mishandling support removal can easily damage intricate designs or affect how they work.
Removing Supports from Articulated Models
Articulated models like flexi dragons, fidget toys, and multi-part keychains come with unique challenges. Their moving parts need to remain functional after the supports are removed. To avoid deformation, let the print cool completely before starting - removing supports while the material is still warm can permanently misalign joints.
Start by identifying which supports are structural and which are gap fillers. Remove the structural supports first using needle-nose pliers, applying a gentle twisting motion. Work from the outer areas inward, leaving the joints for last to maintain overall stability.
Precision is key when working around joint mechanisms. Make clean cuts as close to the support contact points as possible, being careful not to nick the articulated parts. Trim any leftover material that might interfere with movement, and test each joint as you go. If a joint feels stiff, check for hidden support material that might still be lodged inside.
Internal cavities often trap support material, making it harder to spot and remove. Good lighting and fine tools can help you carefully extract these pieces without damaging the connections.
For more complex articulated designs, water-soluble supports like PVA can be a game-changer. They dissolve completely, eliminating the need for manual removal in tight spaces. However, keep in mind that this method requires a dual-extrusion printer setup.
Next, let’s look at specific strategies for handling dice towers and keychains, as these gaming accessories come with their own set of challenges.
Methods for Dice Towers and Keychains
Dice towers and keychains not only need to function well but also require a polished finish, as they’re often on display or handled frequently. For dice towers, start by removing supports at the top opening and work your way down. The internal ramps and channels that guide the dice should be smooth to ensure proper functionality. Use larger tools for the main supports and switch to precision tools for detailed cleanup.
Keychains, on the other hand, require extra care around attachment points. Avoid twisting or bending aggressively; instead, carefully trim away support material to maintain the integrity of the design.
For intricate decorative details, like those often found on keychains and gaming collectibles, precision tweezers are ideal for clearing out any leftover support residue.
Design Tips for Easier Support Removal
Beyond removal techniques, thoughtful design choices can simplify post-processing for gaming accessories.
- Print Orientation: For dice towers, printing horizontally can reduce the amount of support material needed, though it may take longer to print. For keychains and fidget toys, experiment with different orientations in your slicer to minimize supports around critical functional areas.
- Support Settings: A support density of 10–20% strikes a balance between providing necessary support and making removal easier. Increasing the Z-distance between the print and the supports creates cleaner break points, while tree supports reduce contact points, especially for intricate designs.
- Design Adjustments: Adding chamfers or fillets can reduce the need for supports. Incorporating natural break lines into the design can also help by creating intentional attachment points that are easier to remove.
- Support Interfaces: These create weak points that allow for cleaner and more predictable removal. While they may leave slight scarring, light sanding can usually smooth these areas out, which is often better than risking damage from overly strong bonds.
Investing time in thoughtful design and preparation makes a big difference, especially when producing multiple copies of gaming accessories or collectibles. By focusing on both aesthetics and functionality, you’ll achieve high-quality results that stand out.
Conclusion
Perfecting the art of advanced support removal can take your 3D prints from average to truly polished. Often, the difference between a so-so print and one that stands out lies in how well you handle the post-processing stage.
It all starts with understanding your support material. Whether you're using breakaway supports, soluble materials like PVA, or resin supports, each type requires a unique approach and specific tools to avoid costly errors and achieve clean results.
Allowing your prints to fully cool or cure is another crucial step. Skipping this can lead to warped joints or surface defects. For items like dice towers or articulated fidget toys, taking the time to let the material settle ensures smooth movement and a polished look.
When it comes to tools, precision is key. Combining larger tools for removing bulk material with finer instruments like flush cutters, precision pliers, and hobby knives allows you to tackle intricate areas effectively. This balance of tools ensures a professional finish.
Your print's orientation and slicer settings also play a big role in simplifying post-processing. For example, using tree supports or keeping support density between 10–20% can save you time and effort later. Thoughtful planning during the slicing phase often determines whether support removal feels like a quick touch-up or a frustrating chore.
For gaming accessories and collectibles, these advanced techniques help maintain delicate details. Removing supports from the outermost areas first, testing articulated joints as you go, and using proper lighting to spot hidden material are small steps that make a big difference in the final product.
Whether you're crafting keychains, dice towers, or articulated models, these methods ensure your 3D-printed pieces not only look great but also function smoothly. With the right tools, techniques, and a bit of patience, you can achieve results that truly stand out.
At 3rd Prints, we bring these expert methods to every project, delivering high-quality, customizable products that meet the highest standards.
FAQs
How can I safely remove supports from detailed 3D prints without damaging them?
To safely remove supports from detailed 3D prints, begin by closely examining the model to pinpoint where the supports are attached. Use tools like precision pliers, hobby knives, or flush cutters to gently detach the supports. Start at the outer edges and gradually work your way inward. Be gentle - applying too much force can damage fragile sections.
If the material permits, soaking the print in warm water can soften the supports, making them easier to remove. Afterward, use sandpaper or a file to smooth out any rough areas. Take your time and work carefully to maintain the quality and detail of your 3D print.
What’s the difference between dissolvable and breakaway supports when it comes to ease of removal and print quality?
Dissolvable supports offer a hassle-free removal process as they dissolve in water or a specific solution, saving you from tedious manual work. They're especially useful for intricate designs since they minimize the risk of damaging delicate surfaces. That said, they typically require a dual-extruder printer and can take several hours to fully dissolve.
Breakaway supports, by contrast, are removed manually by peeling them off, which makes the process much faster. However, they can leave behind marks or cause minor distortions, particularly on complex prints. They’re a better choice for simpler designs or when you need a quicker post-processing option.
To put it simply, dissolvable supports are ideal for detailed prints with smooth finishes, while breakaway supports are more suited for straightforward designs and faster cleanup.
What are the best tools and techniques for achieving a smooth finish on 3D-printed gaming accessories like dice towers and keychains after removing supports?
To get a polished look on 3D-printed gaming accessories like dice towers or keychains after removing supports, start with the right tools. Use X-acto knives, needle-nose pliers, and fine files to carefully take off supports without harming the print. Once that's done, smooth out the surface using fine-grit sandpaper - something like 800-grit or higher works well. For an ultra-smooth finish, you can also try applying polishing compounds or a smoothing resin, such as XTC-3D.
If you’re dealing with stubborn support remnants, a little gentle heat from a heat gun can soften the material, making cleanup much easier. By combining these methods, you’ll achieve a clean, polished result that’s ideal for both functional and decorative gaming accessories.